Monday, October 10

Handsomely Hello Entryway Table

Maybe you've noticed my lack of blogging lately? 
This is why!

I'm in a race with Good Olde Father Winter and I'm so gonna WIN....I hope.

I have lots of projects I can't wait to tell you about. I thought I would jump on and share this quick little guy; you know, just so you don't forget about me. 

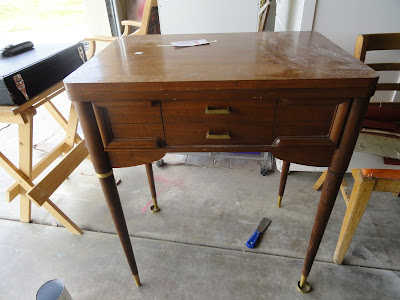
Before 
Sewing Table
He's pretty handsome the way he came but I'm thinking small entryway table and I don't want his top to open anymore. 

After
Entryway Table


The Run Down
1. I removed the sewing machine.
2. Separated the two top pieces and then screwed the very top piece to the base of the table using the same holes and the same screws. 
3. I removed all this hardware
Don't be scared to remove hardware. It looks scarier than it is. 
4. Gave him a quick sanding to remove the shinny.
5. Painted, wet sand, a tad distressing and a rubbed wax finish. 
6. Finally, I put his hardware back on.
So EaSY!

He has handsomely sleek hardware doesn't he?


And look, he has a secret.......
Please excuse the frames all over the stinkin' floor.

I love the color too.


Do you want to see a few sneak peeks of what I've been working on?
Anything for you.

This 

and this

and this

and all this CRAP!
Don't call my crap CRAP! I LoVE that CRAP.

Have a great week and 
                         EnJoY!

I'll be linking up all week so come and PaRTY with me
ThaNkS for the LiNk uP LaDiES!


Wednesday, August 17

Who Paints a CoUCh?

Who Paints a Couch?

We Do!

This is my cute friend Melissa. Yes we did paint this couch. 
Disclaimer: this couch is not going into a living room; it is a prop, so you can stop freaking out.

A prop for what? Melissa has twin girls and she was having a party for them and she needed a PINK couch.....so, you know, we painted it PINk.

I know you are dying to do this to your own couch so I will tell you how :)
1.Take all the trim off.
2. Vacuum the crap out of it and then clean it with bleach.
3. Apply 3 gallons of  KILZ oil based primer.


4. Ruin your flip fops because you can't paint with a roller without getting it all over.
5. Use the whole stinkin' can (gallon) of  BrIGHt PiNk paint.
6. Explain to every single person that walks by that we are not crazy; we are creative.
7. Have a crazy friend who buys way too much trim because she thinks every trim is just ToO white, when really it all looks exactly the same. ( love ya Melissa)
8. Paint the wood white.
9. Apply the trim with hot glue.
10. Lay on your friends couch like you would lay on any other plastic feeling couch.
Melissa did steps 2,7,8 and 9 all by her self. Steps 4 and 10 where all me.
I actually really love it.

EnJoY!

ThaNkS for the LiNk uP LaDiES!

Wednesday, August 10

Fighting For Sis

I hope a couple of you have noticed that I haven't been around or posting for a couple of months. Life has been a LiTTle CRaZy to say the least. We have had so much going on, I had to take a little break so I could try to catch up; I'll spare you the details. I haven't caught up, but hey we're still alive and  I really miss my redo's and blogging so I'm back. 

Before

After

This redo is for an auction we are having for Sis. Sis is my little sister who was diagnosed with Breast Cancer at the beginning of this year. The last post I wrote about this. Since then She has had 2 surgeries one of which was a double mastectomy.


Let me tell you......She's one Heck of a fighter!
At War With My Rack- I LoVE it! Hee Hee

She just finished up her last round of Chemo.
Isn't she cute?

As you can imagine this kind of attention cost a lot of $$$$$$. I don't know if I've ever told you this but I live in the most amazing neighborhood in the world. A couple of my neighbors had a great idea to have an auction to raise money to help Sis out with the medical bill. It has grown into quite the event.
Doesn't this look so fun!?!
If any of you crazy talented women would like to share your talents and donate something to this auction I would be forever grateful. Gift Cards, Gift Baskets, Whatever you would like to donate will be perfect. It will be a silent action held on August 27th along with other activities. Let me know if you're interested in helping us out.


Now on with the redo!

Ugly


Cute
These little side cubbies are great for storage and so cute. Can't you just imagine what fun treasure a little girl would hide in there.
I started this redo out by ripping all the gross velvet out of her drawers and cubbies.
I kept it all so I could use it for a patters on the new lining.

I used Goo Gone and a puddy knife to remove all the left over adhesive and paper.
I just let the Goo Gone sit for a few minutes before using the puddy knife to scrape it off. I also used Dawn and hot water as a finishing cleaner.

I measured and cut poster paper to match the patters I kept. Then I put them all in place to make sure they fit well. After I was sure it all fit perfectly I cut the fabric leaving a 1/4 inch edge on each side and used spray adhesive to apply it to the poster paper. Then I folded the 1/4 inch edge over and glued it down with fabric fusion. I used an all purpose Liquid Nails to apply each piece to it's coordinating wall.
I hope that made sense.

I LoVE the way it turned out!

The bench was a whole other story. 

Ugly

Adorable

My sweet mom made the cute ruffle for me.
Sometimes I wonder if these manufactures think people won't REALLY use their furniture, because sometimes they don't build it for REAL LIFE use as is the case with this bench. I just can't put my time into a piece and have it really be a piece of  "swear words". So with my dad by my side we just rebuilt the dang thing and now she is ready for her REAL LIFE experiences. 


Here's a few more close ups for ya.


One More Thing.......
I have been putting off saying this for a few months because truthfully, if I sit down to write about it then I have to really think about it. I don't really like thinking about this because I just end up having a crying fit and know one like that, right.
So I'm going to put on my big girl pants and say it now.
I LOVE YOU ALL!
I have been very overwhelmed by the love that comes from complete strangers during hard times. Thank you to everyone for your prayers, thoughts, comments and support during this fight. It's not my fight but it's so hard to watch. It has been so comforting to me knowing that so many people were and are praying for Sis and her family. Your sweet comments and emails really have meant so much to me and I am sorry I didn't have anything to write back. I love this blogging community and the support that is offers in every way to one another. Thank you! Thank you! Thank you!
Love ya 
& EnJoY!


I'll be linking up all week so come and PaRTY with me
ThaNkS for the LiNk uP LaDiES!


Sunday, May 22

All GiRL!

Before

After
Wanna know how I did it? Then read on Sista!

I found this at my local thrift store and thought IT would be a fun redo. I was right and yes I called it an IT. I couldn't deiced if IT was a boy or a girl. I new I wanted to add molding to it, so I got my molding and was just hoping it would come to me as I worked on it.

It needed a few repairs first.
*See that piece of wood lying on the bottom of the wardrobe? 
It actually goes underneath and there is nothing holding the floor to the rest of the dresser. 
*See how the drawers are a little saggy?
That's an easy fix that makes all the difference.

BROKEN
I actually just cut a new piece of wood and fastened it to the base of the dresser and then used finishing nails to nail down the bottom of the wardrobe. Then I filled the nail holes with wood filler.

FIXED
I did fix the drawers but you will just have to notice that in the after pictures. Most of them were straightened out with a little bit of sanding and for the others I use
1/2"  Self Adhesive Vinyl Bumpers. I keep these little suckers on hand for lots of things. They work great and stay put.
HARDWARE CASTERS / FLOOR PROTECTION 7743461 SELF ADHESIVE BUMPERS          Stick to back of frames to protect walls.
There was also a little piece on the side of the door that was loose and would probably fall off as soon as I got it all done so I broke it off and then fixed it.

BROKEN
I just used a little wood glue and then sanded to make smooth. 

FIXED


After all the fixing was done I gave it a quick sanding. I've had quite a few people ask me why I sand even if I prime as well. 
This is why!

Junky Looking
In my opinion there is a BIG difference in junky and shabby or rustic.

Shabby Looking

Junky Looking

Shabby Looking
Enough said.

I added molding

along the top

on the inside of the door

and along the bottom.
Keep reading to see the molding. Sorry, no photos

I know what you're thinking..... 
Molding? Really? I can't do molding. 
You can so do molding! I use to be so intiimadated by those dang corner cuts. Then I finally tried it and it was way too easy. All it is is 45 degree angle cuts. If they don't turn out perfect you can just puddy them and they will look great. Just try it and you will see how easy it really is. 

And then I saw it.........She is definitely a GiRL!

Since I new she was a girl and I had a ton of left over paint from the pink toy box I deiced to paint her pink.
First I gave her a good coating of Kilz. If I am doing furniture for a child I always Kilz it up just because you never know what kind of paint might be on it or what a child will do with it's surrounding. You know licking, picking or whatever else the heck they will think of. Kilz seals everything in. 
This is just the inside of the wardrobe but I Kilzed it all, even the insides of the drawers.

I painted her pink and then sealed her up with some polyurethane.

I painted her hinges white to match her new knobs.

Door Knob

Drawer Knobs
You know it, I got cute knobs from Hobby Lobby @ 50% off!

I know this seems like a lot of steps and it is but most things just take a few minutes to do. Just remember that if you are new to this just start with small pieces and work your way up to the bigger pieces. 

What do you think of my molding? 
I LoVE it! I think it gives her a whole new look.

Top


Door

Bottom

One Last LOOK


I just have to show you one more thing because it made me crack my head off.
I was staging this and the Pink Birdie Toy Box on a night when we were finishing up a family dinner. So I was running around finding nicknack's to put on the top of the wardrobe and I came back to find this.....
Nothing says PRECIOUS like a grown man hugging an ugly duck with his eyes closed like he's dreaming of his new pink dresser. Precious or CREEPY, I don't know. Hee Hee

My little nephews got in on the staging too.
Don't ask me what this is all about, I just found it there and got into trouble when I went to move it out of the picture.


                      EnJOY!

If you are looking for some inspiration you have to check out these PaRTiES. I only link up to PaRTiES that I LoVE and visit often.
ThaNkS for the LiNk uP LaDiES!